Last week I had a brief Twitter conversation with @polarwander about the feasibility of using QGIS for geologic mapping. If you've read any of my posts (rants?) before, it will come as no surprise that my usual response to any question that starts out "Can I use QGIS for..." is yes. There are limitations and things that are easier in other software packages but the integration of GRASS, Saga, TauDEM, etc., within the Processing Toolbox makes it a viable option for most situations. However I couldn't find a quick link to share that explained how to use a basic strike and dip symbol in QGIS - so this is my attempt at providing a little guidance.
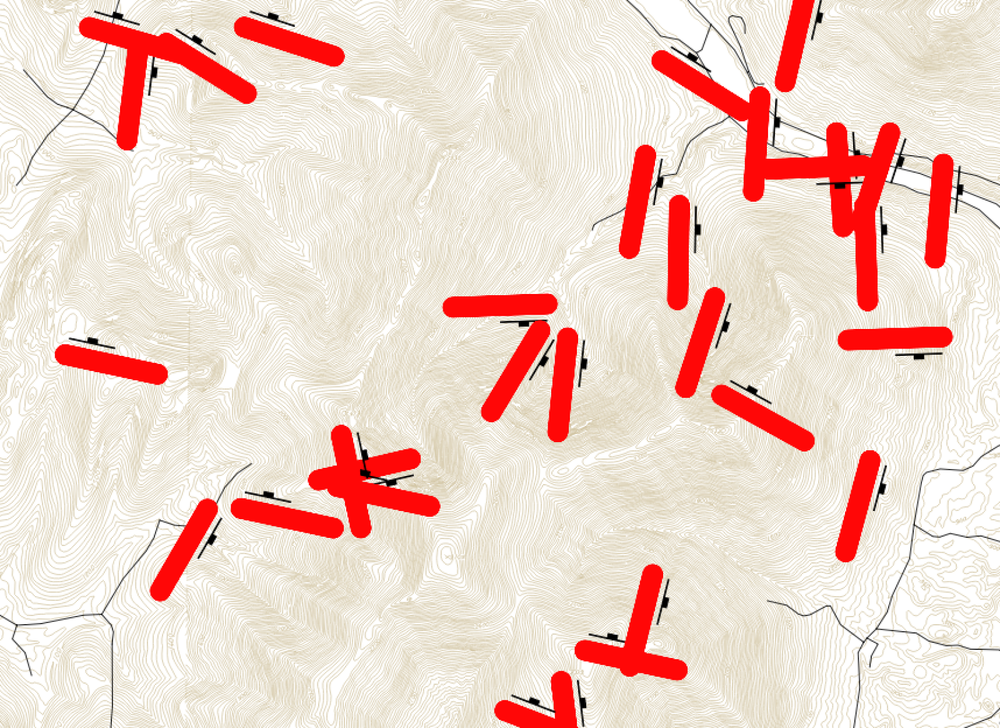
By default QGIS doesn't install with a library of geologic symbols. I started with SVG symbols from the QGIS repository here. The symbols worked fine when I added them to the view but when I tried rotating them I ended up with weird red lines next to each symbol (Figure 1).
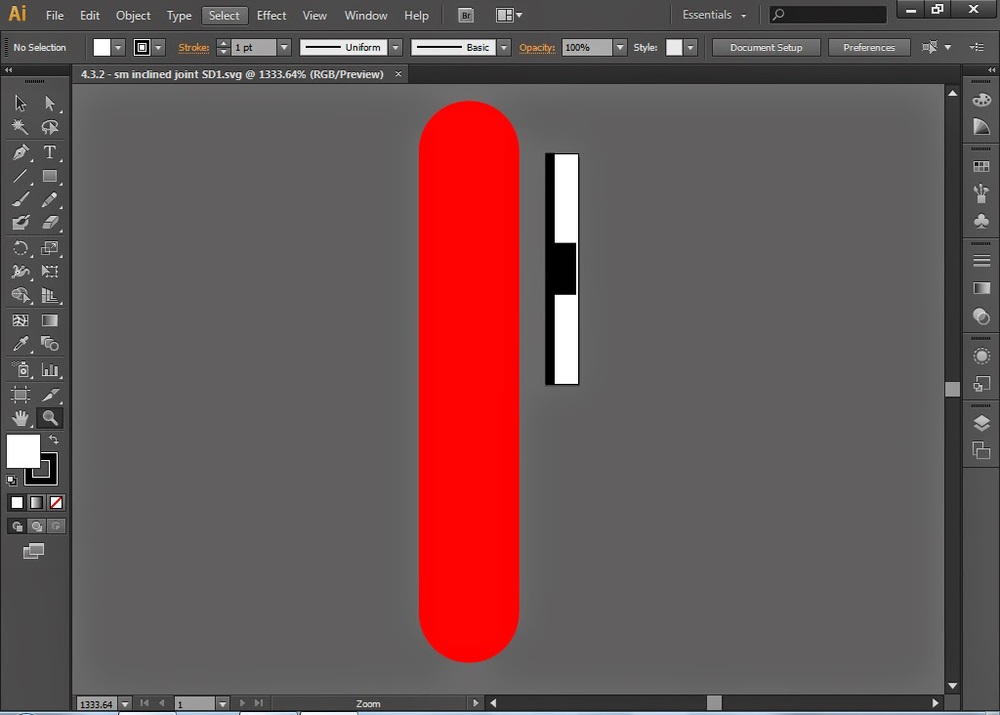
I opened each SVG with Inkscape but didn't find anything except the original symbols, but when I opened them in Illustrator I was able to both see and delete the red lines (Figure 2). I can't for the life of me figure out why they didn't show up in Inkscape - if you've seen this before or have thoughts, please post a comment to help clarify.
The updated SVG library can be downloaded here: https://github.com/vanhoesenj/FGDC-Joints-SVG. To be clear these are the same files available on the QGIS repository, all I did was open each file, ungroup the elements, delete the red line and re-save. You can download only the SVG files you need, the zip file or the entire repository if you're comfortable using a GitHub client.
Once you download the files of interest you need to copy them into the folder where you QGIS SVG libraries reside. I flip-flop between a PC and Mac these days so if you're using a PC you'll usually find these folders in one of three places depending on how you installed QGIS:
If you're using a Mac, you need to open Finder and click on Applications, scroll down to QGIS, right-click and 'Show Package Contents." You will want to copy the new SVG library into: /Applications/QGIS.app/Contents/Resources/SVG (Figure 3).

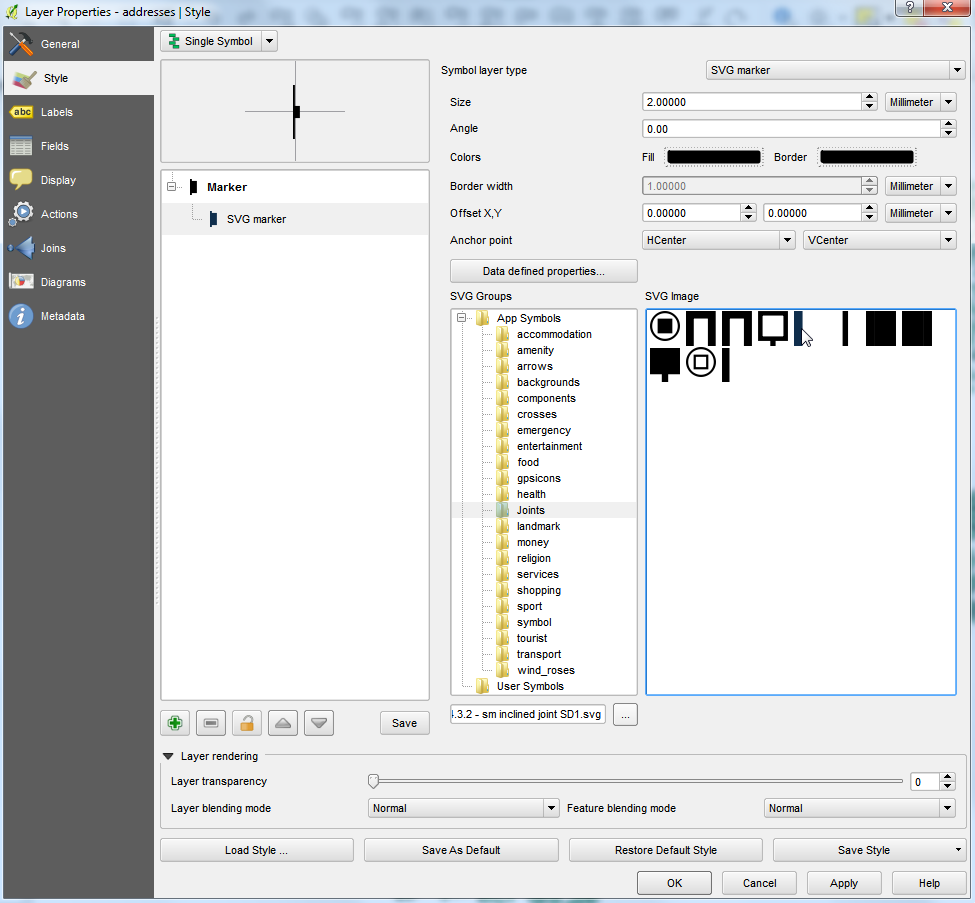
To add strike and dip symbols to your map, you need to open up the Properties - Style dialog box of your point layer, select SVG Markers and select the appropriate symbol in the Joints folder (Figure 4).
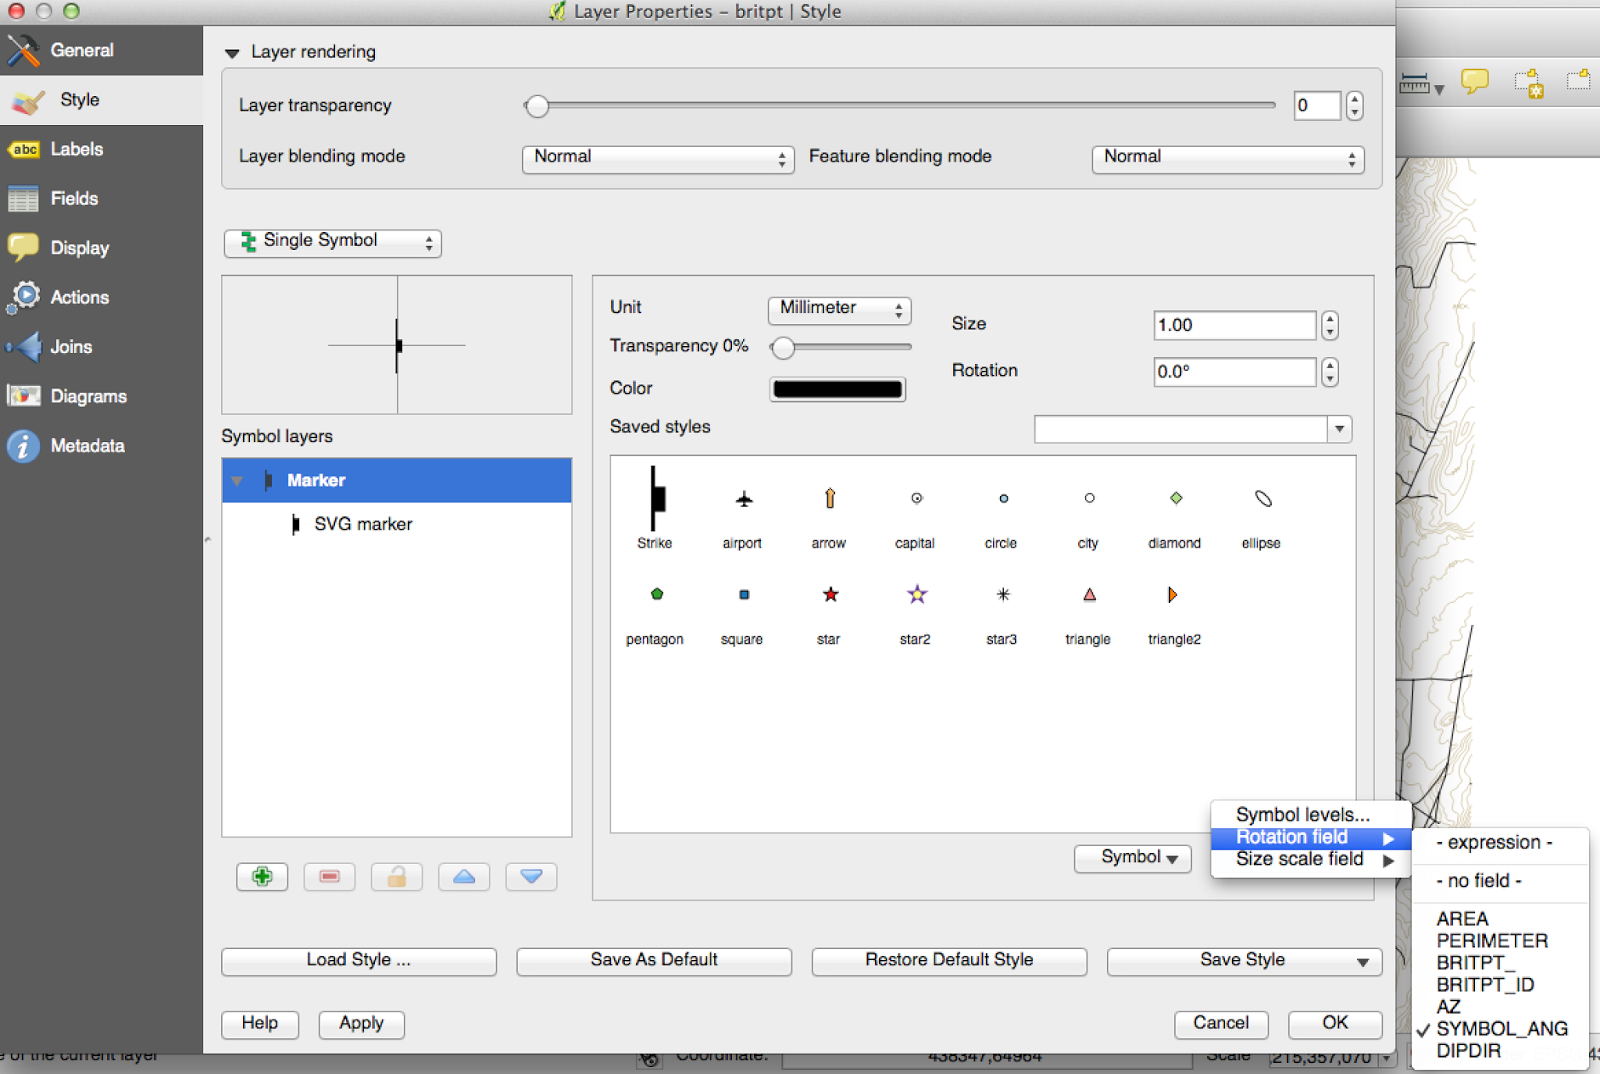
This will add the symbol to your map but it won't properly orient your strike and dip symbol so you need to make sure your attribute table has a rotation column (e.g. - strike, azimuth, etc) and go back to the marker dialog, select Advanced - Rotation Field (Figure 5). This is where you need to pay attention to how your data is formatted. All the joint symbols are initially oriented North and follow the right-hand-rule, so make sure you know how the data was collected and ensure your symbols are properly oriented.
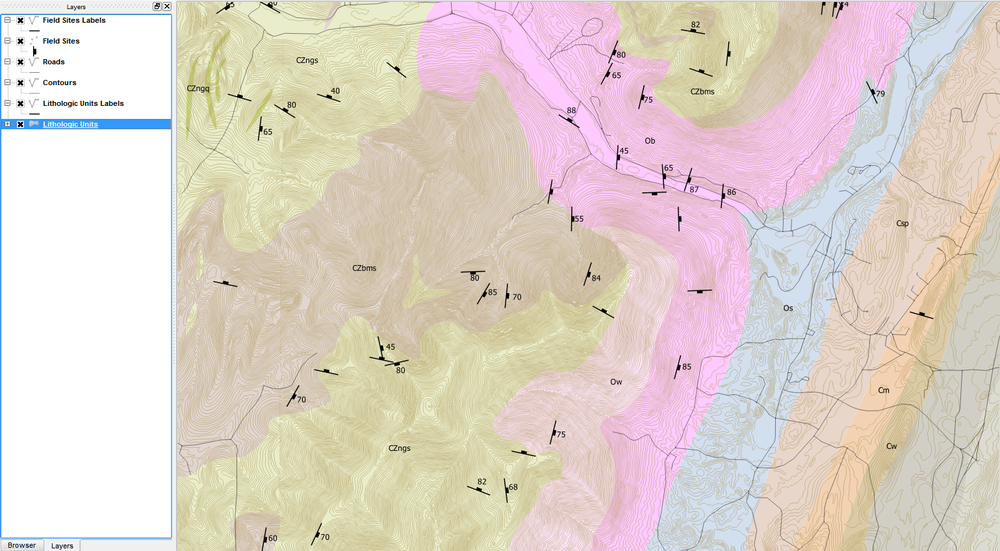
All that's left is resizing the symbols so they look appropriate with the scale of your map. Finally, you will likely want to add dip values to the map. You can use the label tab to set the label field to whatever the name of the field is containing your dip measurements. Another option is to add the Easy Custom Labeling plugin to create a new layer containing dip labels. The advantage of using this approach is you can start editing this layer and manually move each dip label so that it is properly situated next to every dip symbol (Figure 6).
Hopefully this is helpful for folks contemplating migrating at least some of their GIS workflow over to QGIS. There are a lot other ways to streamline labeling and fill patterns using PostGIS too. Feel free to send me 'how to' questions @taconic_musings and when time permits I'll create an equivalent tutorial answering your questions (if I know the answer). If you are looking for additional geology symbols, Ryan Clark (@worbly) started a GitHub repository that contains a variety of FGDC compliant symbols - you can explore and contribute to if you want!
By default QGIS doesn't install with a library of geologic symbols. I started with SVG symbols from the QGIS repository here. The symbols worked fine when I added them to the view but when I tried rotating them I ended up with weird red lines next to each symbol (Figure 1).
Figure 1: Odd red stroke adjacent to each strike and dip symbol in QGIS.
I opened each SVG with Inkscape but didn't find anything except the original symbols, but when I opened them in Illustrator I was able to both see and delete the red lines (Figure 2). I can't for the life of me figure out why they didn't show up in Inkscape - if you've seen this before or have thoughts, please post a comment to help clarify.
Figure 2: Stroke visible in Illustrator. I un-grouped the elements and deleted the offending red line.
The updated SVG library can be downloaded here: https://github.com/vanhoesenj/FGDC-Joints-SVG. To be clear these are the same files available on the QGIS repository, all I did was open each file, ungroup the elements, delete the red line and re-save. You can download only the SVG files you need, the zip file or the entire repository if you're comfortable using a GitHub client.
Once you download the files of interest you need to copy them into the folder where you QGIS SVG libraries reside. I flip-flop between a PC and Mac these days so if you're using a PC you'll usually find these folders in one of three places depending on how you installed QGIS:
- If you used the OSGEO installer on a 64-bit machine: C:\OSGeo4W64\apps\qgis-dev\svg
- If you used the OSGEO installer on a 64-bit machine: C:\OSGeo4W\apps\qgis-dev\svg
- If you used the standalone installer: C:\Program Files (x86)\Quantum GIS Valmiera\apps\qgis\svg
Note: Your version of QGIS may be different (e.g. - Lisboa instead of Valmiera, etc).
If you're using a Mac, you need to open Finder and click on Applications, scroll down to QGIS, right-click and 'Show Package Contents." You will want to copy the new SVG library into: /Applications/QGIS.app/Contents/Resources/SVG (Figure 3).
Figure 3: Location where you need to copy new SVG libraries to use in QGIS (running OSX).
To add strike and dip symbols to your map, you need to open up the Properties - Style dialog box of your point layer, select SVG Markers and select the appropriate symbol in the Joints folder (Figure 4).
Figure 4: Style tab under Layer Properties where you can select SVG Marker as the layer type and then the appropriate joint symbol.
This will add the symbol to your map but it won't properly orient your strike and dip symbol so you need to make sure your attribute table has a rotation column (e.g. - strike, azimuth, etc) and go back to the marker dialog, select Advanced - Rotation Field (Figure 5). This is where you need to pay attention to how your data is formatted. All the joint symbols are initially oriented North and follow the right-hand-rule, so make sure you know how the data was collected and ensure your symbols are properly oriented.
Figure 5: Marker dialog where you can set the rotation field (the advanced button is next to the symbol button).
All that's left is resizing the symbols so they look appropriate with the scale of your map. Finally, you will likely want to add dip values to the map. You can use the label tab to set the label field to whatever the name of the field is containing your dip measurements. Another option is to add the Easy Custom Labeling plugin to create a new layer containing dip labels. The advantage of using this approach is you can start editing this layer and manually move each dip label so that it is properly situated next to every dip symbol (Figure 6).
Figure 6: Simple bedrock geologic map with rotated and labeled strike and dip symbols.
Hopefully this is helpful for folks contemplating migrating at least some of their GIS workflow over to QGIS. There are a lot other ways to streamline labeling and fill patterns using PostGIS too. Feel free to send me 'how to' questions @taconic_musings and when time permits I'll create an equivalent tutorial answering your questions (if I know the answer). If you are looking for additional geology symbols, Ryan Clark (@worbly) started a GitHub repository that contains a variety of FGDC compliant symbols - you can explore and contribute to if you want!